
by P. Kendall and J. Sofos* (5/12)
Quick Facts…
- Fruit leather is made by drying thin layers of pureed fruit in the oven or dehydrator.
- Fruit leather dries in 4 to 10 hours at 140°F to 145°F.
- Properly dried fruit leather is translucent and slightly tacky to the touch, but easily peeled from the pan.
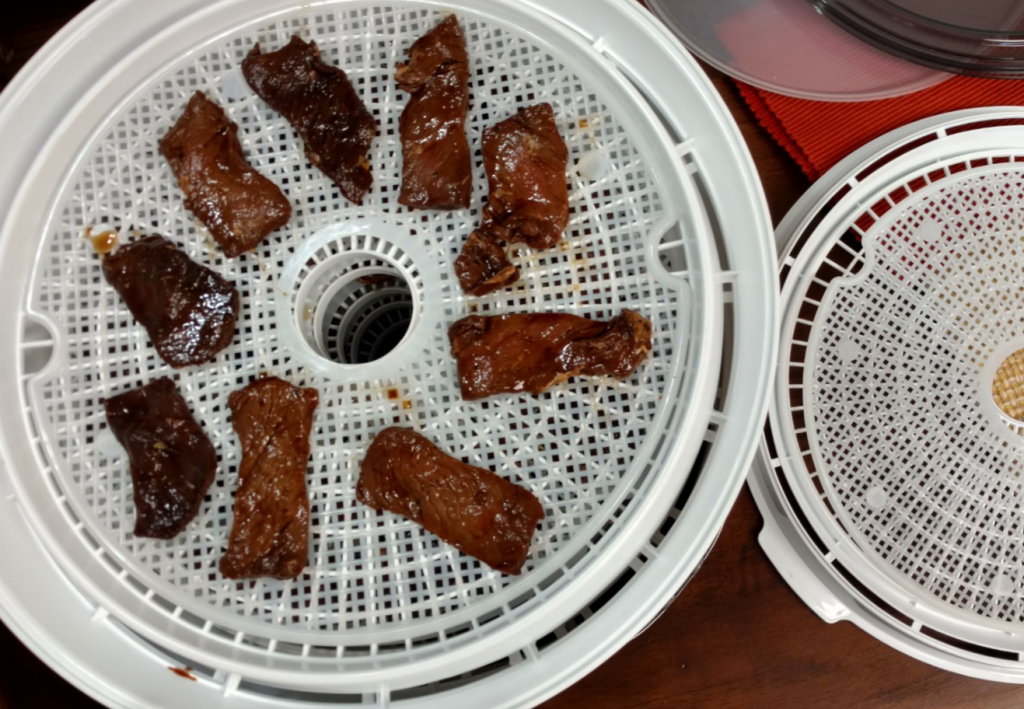
- Jerky is made by drying thin strips of lean meat in the oven or dehydrator at 145°F for 10 to 14 hours.
- Only tested recipes that assure adequate destruction of bacteria should be used for fruit leather and jerky preparation.
- Always wash and sanitize cutting boards, utensils, and counters with hot, soapy water before and after any contact with raw meat or juices.
Fruit Leather
Fruit leather is made by drying thin layers of pureed fruit in the oven or dehydrator. Sometimes called fruit rolls or taffies, fruit leathers make delicious, wholesome and nutritious high-energy snacks for people on the go. They are relatively light in weight, easy to prepare and a good way to use left-over canned fruit and slightly over-ripe fresh fruit.
Fruit leathers can be eaten as is, or made into a beverage by combining 5 parts water with 1 part leather in a food blender. They also can be used in pie fillings, in cooking and as a dessert topping.
Most fruit or combinations of fruits can be used. Apricots, apples, grapes, berries, bananas, pineapples, oranges, pears, peaches, plums, melons, and most tropical fruits can be blended and dried to make fruit leathers. Grapefruit and lemons are not recommended because they turn bitter when dried.
Drying is one of the least exact ways to preserve foods. The length of drying time will depend on the equipment used and the humidity of the air. In the past, recommendations for preparing fruit leather from both fresh and cooked fruit have been given. However, because of increasing concerns with bacteria such as Escherichia coli O157:H7 (E. coliO157:H7) being able to survive the drying process if present, it’s best to heat the fruit to 160°F before drying. Preheating also stops the maturing action of enzymes in the fruit, helps preserve the fruit’s natural color and speeds the drying process.
Leather Preparation
Select ripe or slightly over-ripe fruit. Sort and thoroughly rinse or scrub the fruit under running water. Remove and discard blemishes or defective parts. Peel tough-skinned fruits such as winter apples, oranges, peaches, pears and tomatoes, if desired. Pit and core fruit as needed. Remove seeds from grapes. Hull strawberries.
Cut fruit into chunks and place in the top of a double boiler. Place water in the bottom of the double boiler and bring to a boil. Cover and steam for 15 to 20 minutes or until the fruit is soft and a thermometer placed in the fruit mixture registers at 160°F. The fruit mixture may also be cooked in a microwave oven. Place cut fruit in a glass casserole. Cover and microwave on full power (high) for 6 to 8 minutes per two cups of fruit, stirring every 2 minutes.
Place cooked fruit in blender. Add ½ teaspoon of ascorbic acid crystals or 2 tablespoons lemon juice per 2 cups of fruit to protect the color and help destroy bacteria during drying. If desired, add 1 to 2 tablespoons of sugar, corn syrup or honey per 2 cups of fruit. A small amount of spice (¼ teaspoon cinnamon or a dash of nutmeg) may also be added per 2 cups puree, for taste variety.
Shortcut canned method. Substitute canned fruit or strained baby food without tapioca for the cooked fruit above. Canned applesauce and strained baby fruit will not need to be pureed. Other canned fruits will need to be drained and pureed in a blender, food grinder or by hand. Canned fruits are already processed, which destroys bacteria and stops enzyme action. Thus, the addition of ascorbic acid or lemon juice is not necessary.
Canned fruits, such as applesauce, can be mixed with more expensive freshly cooked fruits to stretch the concentrate and soften the flavor. The addition of applesauce to juicy fruits also eases drying.
Leather Drying
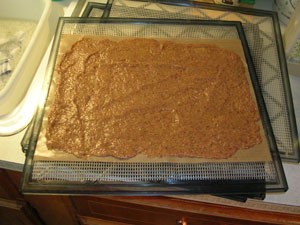
Spray a cookie sheet or similar flat tray with vegetable spray or line with plastic wrap. Make sure the cookie sheet or tray has an edge to prevent spillage of the puree. Spread the fruit concentrate evenly over the pan surface to a depth of 1/8 to 1/4-inch (see Figure 1). Two cups of puree is enough to cover a 12- by 17-inch cookie sheet. Dry the concentrate in an oven or dehydrator.
Oven Drying. Set oven at the lowest setting (140° to 145°F). Place the trays of puree on the oven rack and leave the door open 2 to 6 inches, depending on the oven door. Check the oven temperature periodically with a thermometer to be sure the air temperature of the oven is at the desired level. If necessary, turn off the oven for a short time to reduce the temperature. The fruit concentrate should dry in 4 to 10 hours. Test frequently for dryness (see test for dryness).
Dehydrator drying. Place sheets or trays of fruit concentrate in the dehydrator. Set temperature control at 140° to 145°F or follow manufacturer’s directions. Test frequently for dryness. Drying time will be 4 to 10 hours.
Test for dryness
Properly dried fruit leather will be translucent and slightly tacky to the touch, but easily peeled from the pan or plastic wrap. Test for dryness by touching the leather in several places; no indentations should be evident. Lift the edge of the leather, which will adhere tightly to the surface, and peel it back about an inch. If it peels readily, it is properly dried. If the leather has cooled, it may need to be warmed in an oven at 150°F for a few minutes to help it peel away more easily. If the leather cracks or chips, it has dried for too long, but is still edible.
Storage. After loosening the edge of the leather from the plastic wrap or pan, loosely roll the leather in plastic wrap or waxed paper in one piece. Store the roll in one piece or cut into 1-inch strips. Place the strips or rolls of leather in a plastic bag, glass container, paper bag or other container. Until the leather is completely dry, the container lid should not be tightened nor the bag opening twisted tightly. If the leather has not dried completely, it may become sticky or develop mold growth during airtight storage.
Store fruit leather in a cool, dry, dark place. It will retain good quality for up to one year in the freezer, several months in the refrigerator, or one to two months at room temperature (70°F).
Nutritional Food Values
Nutritional food values become concentrated in dried fruit, and so do calories. Since moisture is gone, the residue is concentrated. A 1- by 17-inch strip of applesauce provides approximately 40 calories, assuming 2 cups of canned sweetened applesauce were dried on a 12- by 17-inch pan.
Meat Jerky
Jerky is made by drying thin strips of lean meat to about one-fourth its original weight. In the past, preparation and heating recommendations for jerky have been quite general. Recommendations have included drying in the sun, oven or dehydrator. Sun drying is no longer recommended due to a lack of steady controlled heat source (145°F) and the potential for contamination from animals, insects, dust and bacteria. Although drying in the oven or dehydrator allows for a safer product, illnesses in recent years due to Salmonella and Escherichia coli O157:H7 in homemade jerky products have raised questions about the safety of all methods of drying jerky products at home.
E. coli O157:H7 is especially dangerous because of the severe consequences of infection, particularly for people who are young, elderly or immuno-compromised. The pathogen has a very low infectious dose, thus raising concerns for food products consumed raw or with inadequate cooking. In addition, E. coli O157:H7 can adapt to acidic conditions and has been found to survive many weeks on dry surfaces, even at refrigerated temperatures. Thus, there is a strong indication for the potential risk of E. coli O157:H7 surviving in dried foods.
One method for ensuring the adequate destruction of E. coli O157:H7 during jerky preparation is to pre-cook the meat to 160°F before drying. This method is currently recommended by the Meat and Poultry Hotline (1-800-535-4555) of the U.S. Department of Agriculture (USDA). Pre-cooking creates a product that is different than traditional jerky and therefore may not be well received by consumers. Also, the product may not dry evenly throughout because of case-hardening on the outside surface.
The jerky preparation methods given below were developed as part of a joint project between the Department of Food Science and Human Nutrition and the Department of Animal Sciences at Colorado State University, and were found effective in reducing E. coli O157:H7 numbers in inoculated samples.
Jerky Preparation
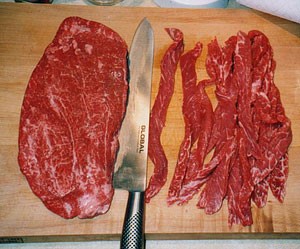
Figure 2. Cut jerky slices.
Use only lean meats in excellent condition. Round, flank and chuck steak, rump roast, brisket and cross rib are good choices. Highly marbled and fatty cuts do not work as well. When preparing jerky products, keep raw meats and their juices away from other foods. Remove any thick connective tissue and gristle from meat. Trim off visible fat with a sharp knife. Fat becomes rancid quickly and causes the development of off-flavors during drying or storage. Freeze meat in moisture-proof paper or plastic wrap until firm but not solid.
Slice the meat on a clean cutting board while still slightly frozen into long thin strips, approximately 1/8 to 1/4-inch thick, 1 to 1½-inches wide and 4 to 10 inches long (see Figure 2). If chewy jerky is preferred, slice with the grain; slice across the grain for a more tender, brittle jerky. Lay the strips out in a single layer on a clean and sanitized smooth surface (cutting board, counter top, cookie sheet). Flatten the strips with a rolling pin so they are fairly uniform in thickness. Prepare strips for drying using either the Hot Pickle Cure or Vinegar-Marinade preparation method described below:
Hot Pickle Cure Preparation Method
Ingredients per two pounds of lean meat strips:
Pickling Spices:
1 1/2 tablespoons salt
1 tablespoon sugar
1 teaspoon black pepper
Hot Pickle Brine:
3/4 cup salt
1/2 cup sugar
2 tablespoons black pepper
1 gallon water
Directions: Place jerky slices on clean cookie sheets or flat pans. Evenly distribute half of the pickling spices on the top surfaces of the jerky slices. Press spices into the meat slices with a rubber mallet or meat tenderizer. Turn slices and repeat on opposite sides. Cover and refrigerate for 24 hours.
Combine ingredients for hot pickle brine (salt, sugar, pepper, water) in a large kettle. Stir to dissolve salt and sugar and bring to a slow boil (175°F). Place a few meat slices at a time in a steamer basket and lower into brine. Simmer for 1½ to 2 minutes, stirring occasionally to make sure all pieces are immersed.
Lift basket out of kettle and drain off liquid. Using clean tongs, remove meat pieces and place flat, without touching each other, on clean dehydrator trays, oven racks or other drying trays. Immediately begin drying as described below. Repeat process until all meat pieces have been pickled in the brine solution and placed in the dehydrator or oven.
Vinegar-Marinade Preparation Method
Ingredients per two pounds of lean meat slices:
Pre-treatment dip:
2 cups vinegar
Marinade ingredients:
1/4 cup soy sauce
1 tablespoon Worcestershire sauce
1/4 teaspoon black pepper
1/4 teaspoon garlic powder
1/2 teaspoon onion powder
1 teaspoon hickory smoked salt
Directions: Place 2 cups vinegar in 9×11-inch cake pan or plastic storage container. Add meat strips to container, making sure vinegar covers all strips; let soak 10 minutes, stirring occasionally to ensure distribution of vinegar on strips.
Combine all marinade ingredients and place in a 1-gallon re-sealable plastic bag. Add lean meat slices to bag; seal bag and massage pieces to thoroughly distribute marinade over all meat strips. Refrigerate bag 1 to 24 hours.
Remove meat slices from bag, and place flat, without touching each other, on clean dehydrator trays, oven racks or other drying trays. Immediately begin drying.
Jerky Drying
Use a calibrated thermometer to monitor the circulating air temperature of the dehydrator or oven. Pre-heat the dehydrator or oven to 145°F for 15 to 30 minutes. Using clean tongs, arrange the meat strips in single layers on the drying trays without touching each other. Place the filled trays in the preheated dehydrator, leaving enough open space on the racks for air to circulate around the strips. Let the strips dry for 10 to 14 hours, or until the pieces are adequately dry.
Test for dryness. Properly dried jerky is chewy and leathery. It will be as brittle as a green stick, but won’t snap like a dry stick. To test for dryness, remove a strip of jerky from the oven or dehydrator. Let cool slightly, then bend the jerky; it should crack, but not break when bent.
When jerky is sufficiently dry, remove the strips from the drying racks to a clean surface. Pat off any beads of oil with a paper towel and let cool.
Storage. Place cooled jerky strips in an airtight plastic food bag or jar with a tight fitting lid. Pack jerky with the least possible amount of air trapped in the container. Too much air causes off-flavors and rancidity to develop. Label and date packages.
Store containers of jerky in a cool, dry, dark place or the refrigerator or freezer.
Properly dried jerky will keep for approximately two weeks in a sealed container at room temperature. It will keep for 3 to 6 months in the refrigerator and up to one year in the freezer. Check occasionally to be sure no mold is forming.
References
Calicioglu, M., Sofos, J.N., Kendall, P.A, Smith, G.C. 2003. Effects of acid-adaptation and modified marinades on survival of post-drying Salmonella contamination on beef jerky during storage. J. Food Protection. 66:396-402.
Calicioglu, M., Sofos, J.N., Samelis, J., Kendall, P.A., Smith, G.C. 2002. Inactivation of acid-adapted and nonadapted Escherichia coli O157:H7 during drying and storage of beef jerky treated with different marinades. J. Food Protection. 65:1394-1405.
*P. Kendall, Ph.D., R.D., Colorado State University, associate dean of research, food science and human nutrition; J. Sofos, Ph.D., Colorado State University professor, animal sciences. 8/94. Revised 5/12.
Colorado State University, U.S. Department of Agriculture and Colorado counties cooperating. Extension programs are available to all without discrimination. No endorsement of products mentioned is intended nor is criticism implied of products not mentioned.